martes, 16 de abril de 2013

METALLIC STRIPES SWEATER DIY


Trate y trate de tomar fotos del suéter que me hice ayer, pero lamentablemente al ser la tela negra no pude tomar buenas fotos, todas salían saturadas o muy negras :( ..
Así que estas son las mejores... de todas formas, la confección es muy simple, hice unos diagramas que facilitan verlo. 
I tried and tried to take photos of the sweater that I did yesterday, but unfortunately when the black cloth could not take good pictures, all saturated or very dark out  =(.

So these are the best ... anyway, the clothing is very simple, I made some diagrams to facilitate him.


Lo primero: Ocupé 1 metro de tela de punto. Con rayas metálicas.
Segundo: Ocupe otro suéter para hacer los moldes. De esta forma me aseguré que me quedaría bien. Medí muy bien la prenda de base y trate de reproducirla lo mas fiel posible en el papel.
Tres: Una vez que estuvieron listos los moldes, los puse sobre la tela y corté. 
Cuatro: Para poder coser esta tela, ya que no cuento con overlock, usé cinta bies en cada una de las costuras. Esto no solo sirve para facilitar la costura, también sirve para que la tela no se deshilache. 
Cinco: Paciencia como siempre y disfrutar de los resultados de hacer tu propia ropa.
First: I took one meter knitted fabric. With metallic stripes.
Second: Occupy another sweater to make molds. That way I made sure that I look good. I measured the garment great base and try to reproduce as faithfully as possible on paper.
Three: Once the molds were ready, I put on the fabric and cut.
Four: To sew this fabric, because I do not have overlock, I used bias tape on each seam. This not only serves to facilitate the stitching, it also serves to make the fabric fraying.
Five: Patience as usual and enjoy the results of making your own clothes.
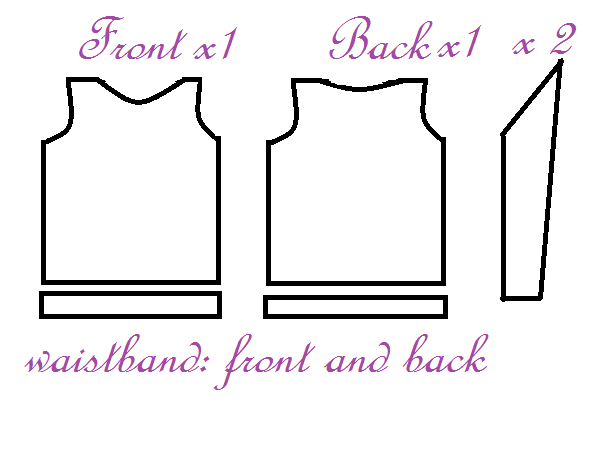


Notas:  Yo cosí el biés, con puntada ZigZag dos veces, luego lo doble y volví a pasar la costura en zigzag. 
Notes: I sewed the bias, with zigzag stitch twice, then twice and I passed the zigzag stitching.


Pincha para agrandar


lunes, 15 de abril de 2013

METALLIC STRIPES SWEATER Inspiration


Desde hace tiempo que quería un suéter negro bastante básico, pero lo cierto es que un negro tan sólido es un poco aburrido. Yo estuve mirando en las tiendas online de  Asos, Topshop, Mango.. etc, hasta que sí con un suéter que me gustó mucho. Primero porque en el verano había comprado 3 metros de tela de punto. Negra con rayas levemente metálicas  muy lindo. Había pensado hacerme una especie de capa, capucha incluida, pero el material es un poco delgado así que no cumpliría con su rol de "tapar". 
En fin, la cosa es que en cuanto vi ese suéter supe que haría con toda esa tela. Un suéter básico, cuello redondo, ni muy largo ni muy corto, un suéter para usar en toda ocasión. 
Y como me queda tanta tela aún, tengo en mente hacer un sueter sin mangas peplum y un vestido de punto. Me encantan los vestidos de lana, son abrigados y quedan muy bien. Ya comencé a cortar la tela, ayer estuve hasta las 12 am midiendo y cortando, tengo las piezas listas, hoy ya corte algunos bies para las costuras, para que no se deshilachen, ya que no tengo overlock para dicha tarea. 


For some time I wanted a black sweater pretty basic, but the truth is that as solid black is a bit boring. I was looking at the online stores Asos, Topshop, Mango .. etc, until the other with a sweater that I really liked. First, because in the summer had bought three meters of knitted fabric. Slightly metallic black stripes, very cute. He had thought me a cloak, hood included, but the material is a bit thin so it would not meet its role of "cover".
Well, the thing is that when I saw this sweater I knew I would do with all that fabric. A basic sweater, round neck, neither too long nor too short, a sweater to wear at all times.
And yet I have so much fabric I have in mind to do a peplum sleeveless sweater and a knitted dress. I love wool dresses are warm and look great. We started to cut the fabric, yesterday I was at 12 am measuring and cutting, I have the parts ready, today to cut some bias seams to prevent fraying, since I have no overlock for the task.


Por cierto no había mencionado que llevo 3 meses haciendo una dieta que mantiene estable la curva de insulina he bajado 5 kilos, además estoy haciendo crossfit, un poco de yoga y parti con danza árabe otra vez .... pronto les contaré de eso :) 

By the way that I had not mentioned three months on a diet that keeps insulin stable curve I lost 5 kilos, and am doing crossfit, some yoga and par with Arabic dance again .... I'll tell you about it soon :)

martes, 2 de abril de 2013

Crafting: with a Old magazine!


Dachshund Canvas


Materials Needed:
  • canvas (I used  30 x 30 cm)
  • old magazine
  • Scissor
  • glue
  • a dachshund's imagen, in black, you only needed the contour. (you can used your favourite animal)
  • a small brush


Instructions:

Apply glue to the canvas with small brush so that it sits very well distributed. While the glue starts to dry very slowly, we will draw leaves the magazine, the idea is not to break them, make them as intact as possible. Search old magazines that have many letters and a few pictures.

You will notice that the glue is already pretty much dry, start putting the first leaves, help yourself with the brush to stick very well, passing your hand gently but firmly to remove air, and also not wrinkled sheet. Repeat until completely cover the canvas.


Aplicar pegamento en la lona con la brocha pequeña, para que este quede muy bien distribuido. Mientras el pegamento empieza a secarse muy lentamente, sacaremos hojas de la revista, la idea es no romperlas, que queden lo más intactas posible. Buscar revistas viejas que tengan muchas letras y pocas imágenes.
Te darás cuenta de que el pegamento ya esta bastante más seco, empieza a poner las primeras hojas, ayúdate con la brocha para pegarlas muy bien, pasa tu mano suave pero firmemente para sacar el aire, y que además la hoja no se arrugué. Repite este paso hasta cubrir por completo la lona.


Bottles! 


jueves, 28 de marzo de 2013

Peter Pan Collar DIY


Peter Pan Collar
Supplies: 
- synthetic Leather
- paper (pattern)
- studs or pearls


Make a pattern of the peter pan collar, and measure it around the neck, make the needed fix. One time the pattern is OK, mark it in the synthetic leather. Cut. Put the studs or pearls.. listo!

Peter Pan Collar
Suministros:
- Cuero sintético
- Papel (patrón)
- Tachas o perlas


Haz un patrón del cuello peter pan, y medelo alrededor del cuello, haz las correcciónes necesarias. Una vez que el modelo está bien, lo marcas en el cuero sintético. Cortas. Pones las tachas o las perlas .. Listo!


miércoles, 27 de marzo de 2013

Make your own Cape // Haz tu propia Capa


In Chile is autumn, although the sun still burning quite. But, I began to prepare for cold days to come. 
Today, I made my own Cape. I think it not took me more than one hour in total.


En Chile es otoño, aunque el sol sigue quemando bastante. Sin embargo, me empecé a preparar para los días fríos por venir.
Hoy día, hice mi propio Capa. Creo que no me llevó más de una hora en total.


supplies// Materiales: - Polar Fleece Fabric // Tela de Polar. 1,20 mts
                                 - measuring tape // cinta de medir
                                 - pins // alfileres
                                 - Needle and thread // aguja e hilo 
                                 - scissors // tijeras
                                 - Studs // Tachas
                                 - a brooch or Pin // un broche o Prendedor


Indications extras // Indicaciones Extras

click for larger image // pincha para agrandar la imagen


Cut a piece of fabric to the neckline, shaped like a Peter Pan collar // Corta un trozo de tela para el escote, con forma de un cuello Peter Pan. 
Sew along the outline of the neckline. // Coselo por el contorno del escote. 

Locate the studs in the neck to give a more personal touch. And presto! Cape Is!!
Ubiqué las tachas en el cuello para darle un toque más personal. Y listo!! está la Capa! 


lunes, 25 de marzo de 2013

♥ Aristóteles Octavio y su Sueter Para Perrito ♥


El Sábado pasado llegó a vivir con nosotros Aristóteles Octavio, es un cachorro Dachshund de casi 2 meses de vida. Hijo de los papás de mi Sibi, por ende, hermanos legalmente jaja. Es un perrito hermoso, muy tierno, amoroso, juguetón. Aunque nació con un problema en su larga espalda y casi no camina, llegó a completar nuestra familia, la Sibila lo adora, se cree su mamá, lo protege y juega con él. Tenemos esperanzas de que se pondrá mejor con el tiempo, que sus músculos se fortalecerán y podrá ser más independiente. Por ahora necesita mucha ayuda para desenvolverse. Sin embargo mi papás tienen un perrito de 2 años, hermano de mi Sibi y de Aristóteles, que también siendo muy pequeño sufrió problemas serios de espalda, cuando era muy bebé no caminaba, se arrastraba, ahora es un perro fuerte y amoroso, aunque camina un poco extraño, pero es 100% independiente. En fin, la cosa es que Aristóteles está aquí y debido a lo pequeño que es, le hice un suéter para abrigarlo. Y de eso se trata es post. de su chalequito 


Diagrama del tejido

Mi intención es compartir el diagrama del punto a crochet, si alguien quisiera hacer un chalequito a su mascota usando el punto, y necesita saber como hacer la parte del cuello, no dude en preguntar.


Mi eterna compañera